Installing and Using wkhtmltopdf / wkhtmltoimage on Cloudways⎘
Tested: November 10, 2025
Use case: Cloudways + Laravel + Snappy or any wrapper that needs wkhtmltopdf / wkhtmltoimage
If you’re using Laravel with Snappy PDF (or similar) on Cloudways Hosting, follow these steps to set up wkhtmltopdf and wkhtmltoimage.
1. Download the Linux Binary⎘
Download the precompiled Linux binary from the official GitHub releases page:
2. Extract the Files⎘
- On your local machine, extract the
.tar.xzfile using WinRAR or 7-Zip (Run as Administrator). - Inside the extracted folder, locate the
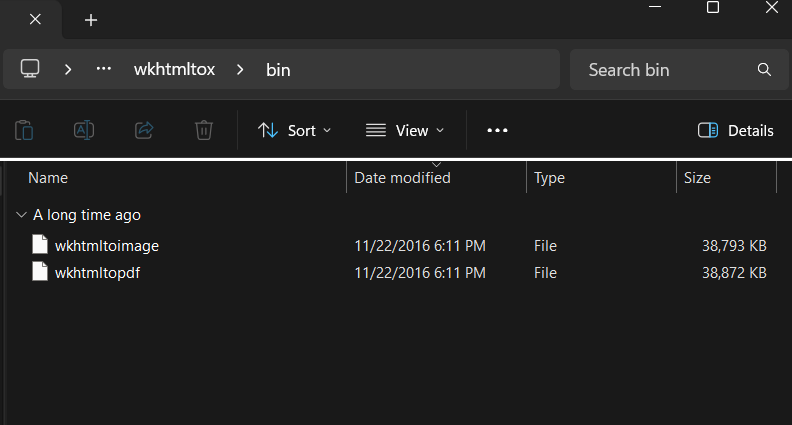
wkhtmltox/bin/directory.
It should contain the following files:
wkhtmltopdf(no file extension)wkhtmltoimage(no file extension)
3. Upload to Your Project⎘
Upload the extracted wkhtmltox folder to your Laravel project on Cloudways via SFTP (FileZilla, etc.).
Example structure:
/your-laravel-project/├── app├── binary│ └── wkhtmltox│ └── bin│ ├── wkhtmltopdf│ └── wkhtmltoimage├── config├── public...4. Reset File/Folder Permissions (Important!)⎘
Cloudways uploads files with application user ownership, which prevents you from setting execute permissions. You need to reset ownership to your SSH user:
- Log in to Cloudways Platform
- Go to Servers → Select your server → Click Globe Button → Select your application
- Navigate to Application Settings → General tab
- Scroll down to Reset File/Folders Permissions
- Select your master user (e.g.,
master_xxxxxxxxxx) from the dropdown
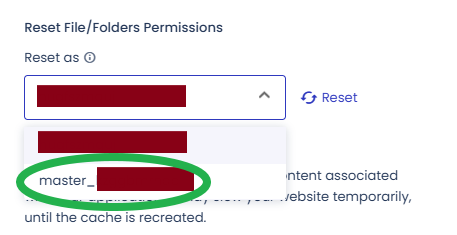
- Click Reset
- Wait for the process to complete
5. Set Permissions⎘
Via SSH (Terminal or PuTTY), run:
chmod +x /home/master/applications/YOUR_APP_FOLDER/public_html/binary/wkhtmltox/bin/wkhtmltopdfchmod +x /home/master/applications/YOUR_APP_FOLDER/public_html/binary/wkhtmltox/bin/wkhtmltoimageReplace YOUR_APP_FOLDER with your actual application folder name.
6. Test the Installation⎘
Verify the installation by running:
/home/master/applications/YOUR_APP_FOLDER/public_html/binary/wkhtmltox/bin/wkhtmltopdf --versionExpected output:
wkhtmltopdf 0.12.4 (with patched qt)7. Configure Snappy in Laravel⎘
Update your config/snappy.php:
return [    'pdf' => [        'enabled' => true,        'binary'  => env('WKHTML_PDF_BINARY'),        'timeout' => false,        'options' => [],    ],
    'image' => [        'enabled' => true,        'binary'  => env('WKHTML_IMG_BINARY'),        'timeout' => false,        'options' => [],    ],];
8. Update .env File⎘
Add to your .env file:
WKHTML_PDF_BINARY=/home/master/applications/YOUR_APP_FOLDER/public_html/binary/wkhtmltox/bin/wkhtmltopdfWKHTML_IMG_BINARY=/home/master/applications/YOUR_APP_FOLDER/public_html/binary/wkhtmltox/bin/wkhtmltoimageReplace YOUR_APP_FOLDER with your actual application folder name.
9. Clear Laravel Caches⎘
Run these commands to ensure Laravel uses the updated configuration:
php artisan config:clearphp artisan cache:clearphp artisan view:clearDone⎘
✅ Done! You can now use wkhtmltopdf and wkhtmltoimage within your Laravel system on Cloudways Hosting.
Troubleshooting⎘
Permission Denied Error⎘
- Make sure you completed Step 4 (Reset File/Folder Permissions)
- Verify ownership with:
ls -la binary/wkhtmltox/bin/- Owner should be your master user, not the application user
Binary Not Found⎘
- Check the correct path with:
pwdls -la binary/- Ensure the folder structure matches Step 3.
Comments & Reactions
(click to open)