How to Set Up Laravel Reverb on Cloudways with FilamentPHP and Cloudflare⎘
Prerequisites⎘
- An existing FilamentPHP project.
- A Cloudways hosting account with a Laravel-based website already deployed.
- Cloudflare DNS configured for your domain.
- SSH access to your Cloudways server via PuTTY or Termius.
Part 1: Local Development Setup⎘
Step 1 - Install Reverb on your FilamentPHP Project⎘
composer require laravel/reverbphp artisan reverb:installThis creates config/reverb.php and adds Reverb environment variables to .env.
Step 2 - Update Local .env⎘
BROADCAST_CONNECTION=reverb
REVERB_APP_ID=<auto-generated>REVERB_APP_KEY=<auto-generated>REVERB_APP_SECRET=<auto-generated>REVERB_HOST="localhost"REVERB_PORT=8080REVERB_SCHEME=http
REVERB_SERVER_HOST=0.0.0.0REVERB_SERVER_PORT=8080
VITE_REVERB_APP_KEY="${REVERB_APP_KEY}"VITE_REVERB_HOST="${REVERB_HOST}"VITE_REVERB_PORT="${REVERB_PORT}"VITE_REVERB_SCHEME="${REVERB_SCHEME}"
Remove any duplicate Reverb entries if reverb:install doubled them.
Step 3 - Publish Filament Config⎘
php artisan vendor:publish --tag=filament-configStep 4 - Update config/filament.php⎘
Uncomment the broadcasting > echo section and set:
'broadcasting' => [ 'echo' => [ 'broadcaster' => 'reverb', 'key' => env('VITE_REVERB_APP_KEY'), 'cluster' => env('VITE_REVERB_APP_CLUSTER'), 'wsHost' => env('VITE_REVERB_HOST'), 'wsPort' => env('VITE_REVERB_PORT'), 'wssPort' => env('VITE_REVERB_PORT'), 'authEndpoint' => '/broadcasting/auth', 'disableStats' => true, 'encrypted' => true, 'forceTLS' => (env('VITE_REVERB_SCHEME', 'http') === 'https'), ],],forceTLS is driven by environment variables, so there is no need to change config between environments.
Step 5 - Update config/broadcasting.php⎘
Make the server-side connection use local Reverb, not the public domain:
'reverb' => [ 'driver' => 'reverb', 'key' => env('REVERB_APP_KEY'), 'secret' => env('REVERB_APP_SECRET'), 'app_id' => env('REVERB_APP_ID'), 'options' => [ 'host' => env('REVERB_SERVER_HOST', '127.0.0.1'), 'port' => env('REVERB_SERVER_PORT', 8091), 'scheme' => 'http', 'useTLS' => false, ], 'client_options' => [],],This is critical for production. Laravel pushes events to Reverb locally (127.0.0.1), avoiding SSL certificate issues.
Step 6 - Clear Caches⎘
php artisan config:clearphp artisan route:clearphp artisan cache:clearStep 7 - Create start-reverb.bat (Windows local dev)⎘
@echo off:startecho Starting Laravel Reverb WebSocket Server...php artisan reverb:start --debug
echo Reverb stopped. Restarting in 5 seconds...timeout /t 5 /nobreakgoto start
Step 8 - Test Locally⎘
- Run
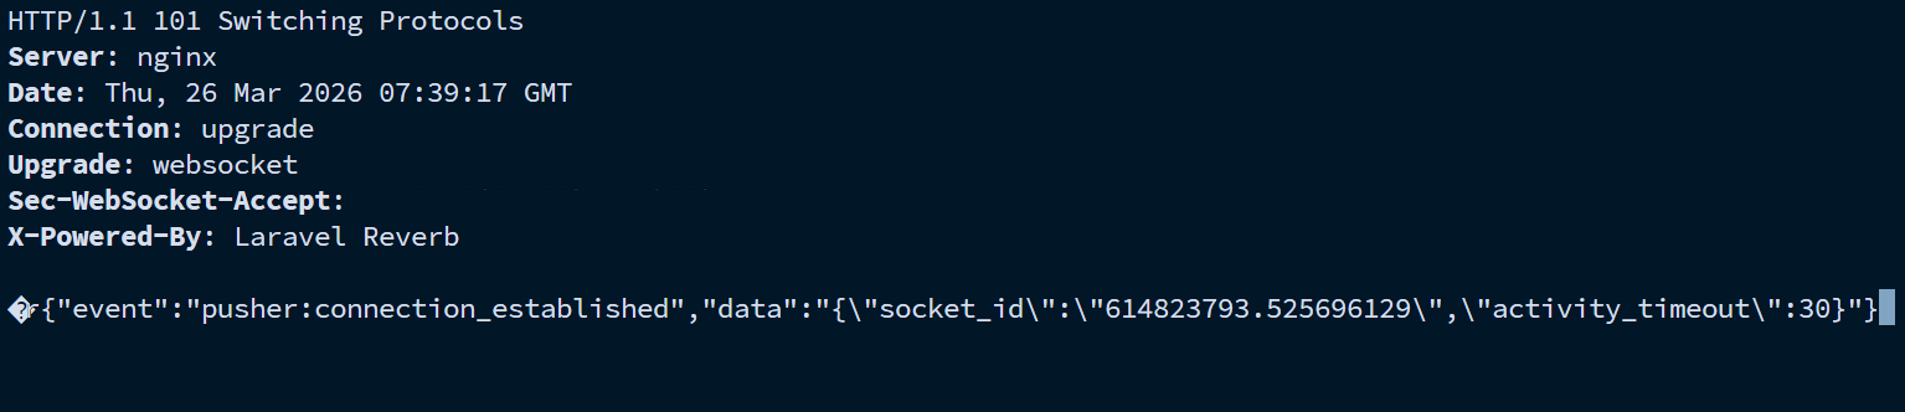
start-reverb.batin one terminal. - Open the system in the browser and inspect DevTools → Network → WS / Socket tab.
- You should see
ws://localhost:8080/app/...with101 Switching Protocols. - Test a broadcast in another terminal:
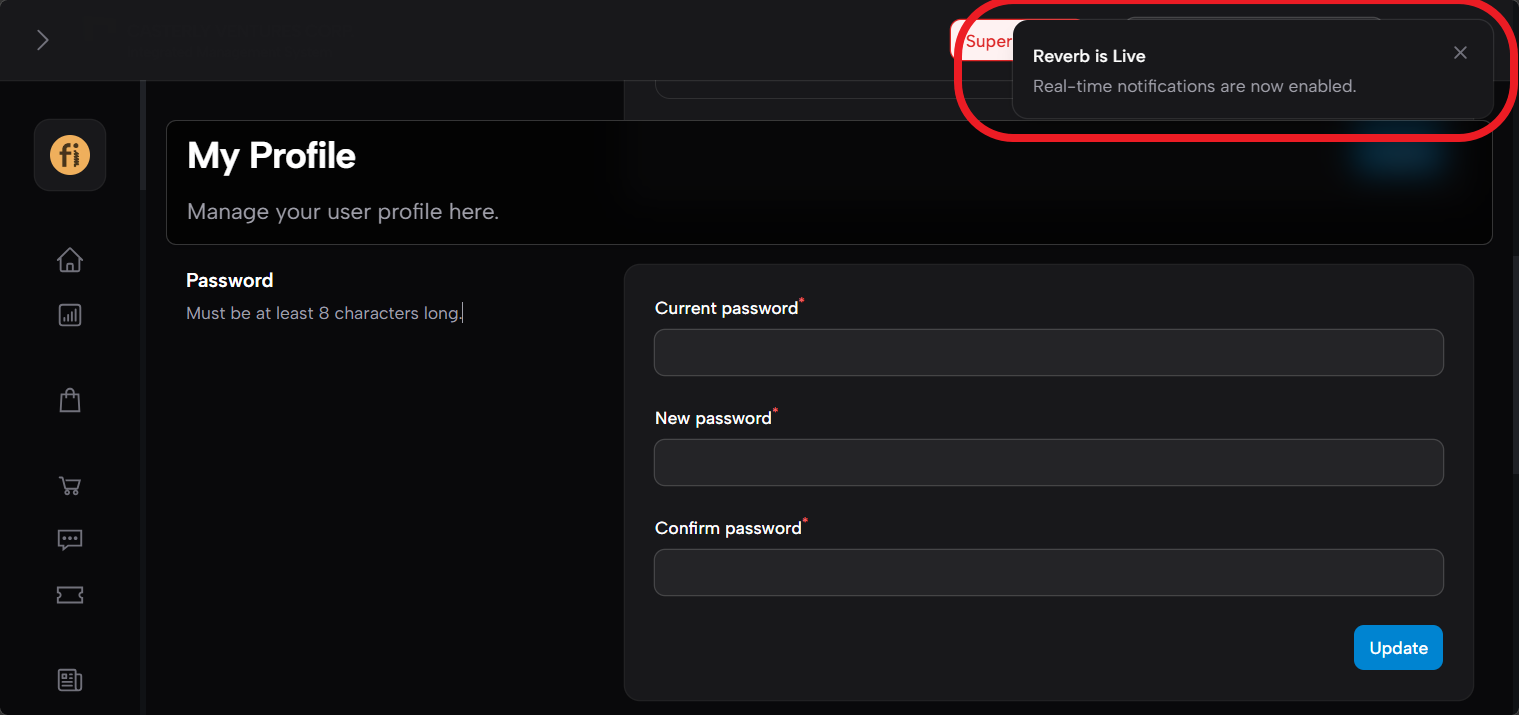
php artisan tinker --execute="\App\Models\User::all()->each(fn(\$u) => \Filament\Notifications\Notification::make()->title('Reverb is Live')->body('Real-time notifications are now enabled.')->broadcast(\$u));"A toast notification should pop up in the browser.
Part 2: Production Setup (Cloudways)⎘
Step 9 - Update Production .env⎘
BROADCAST_CONNECTION=reverb
REVERB_APP_ID=<your-app-id>REVERB_APP_KEY=<your-app-key>REVERB_APP_SECRET=<your-app-secret>REVERB_HOST="ws.yourdomain.com"REVERB_PORT=443REVERB_SCHEME=https
REVERB_SERVER_HOST=0.0.0.0REVERB_SERVER_PORT=8091
VITE_REVERB_APP_KEY="${REVERB_APP_KEY}"VITE_REVERB_HOST="${REVERB_HOST}"VITE_REVERB_PORT="${REVERB_PORT}"VITE_REVERB_SCHEME="${REVERB_SCHEME}"
Key distinction:
REVERB_HOST/REVERB_PORT/REVERB_SCHEME= what the browser connects to publiclyREVERB_SERVER_HOST/REVERB_SERVER_PORT= what Reverb binds to internallyconfig/broadcasting.phpusesREVERB_SERVER_*to push events locally
Step 10 - Cloudflare DNS⎘
Add an A record in Cloudflare under DNS → Records → Add Record:
| Field | Value |
|---|---|
| Type | A |
| Name | ws |
| IPv4 | Your Cloudways server Public IP |
| Proxy | Proxied (orange cloud) |
| TTL | Auto |
To find your CLoudways Server Public IP, check your existing main domain A record or Cloudways → My Servers → Master Credentials → Public IP.
Step 11 - SSL Certificate⎘
Skip this step if your Cloudflare Origin Certificate already covers
*.yourdomain.com.
Ensure your Cloudflare Origin Certificate covers *.yourdomain.com as a wildcard. Check this in Cloudflare → SSL/TLS → Origin Server.
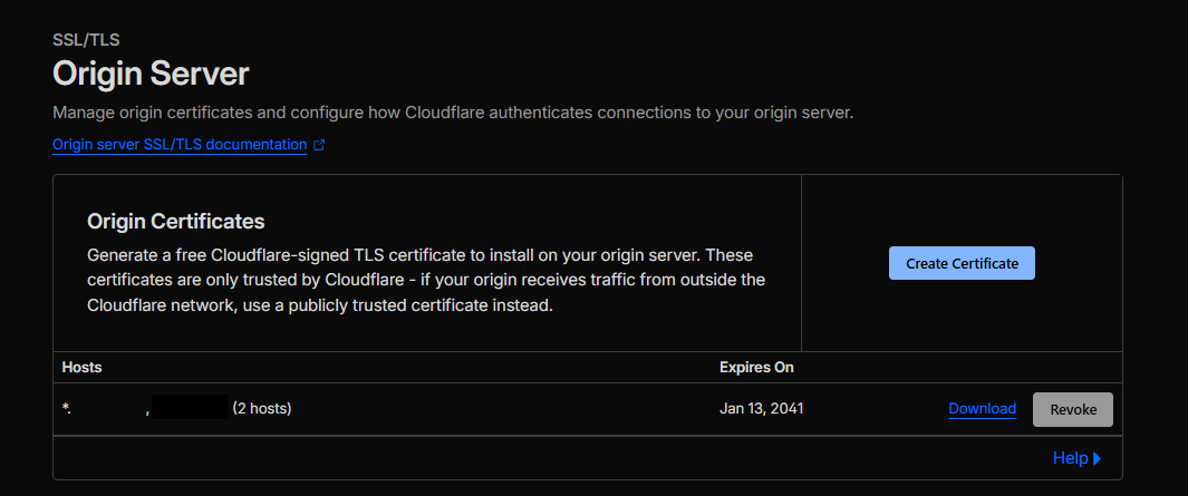
If not, create one using:
| Field | Value |
|---|---|
| Private key type | RSA (2048) |
| Hostnames | yourdomain.com, *.yourdomain.com |
| Certificate validity | 15 years |
Copy the certificate and private key, then upload them to Cloudways → Application Settings → SSL Certificate → Upload Custom SSL.
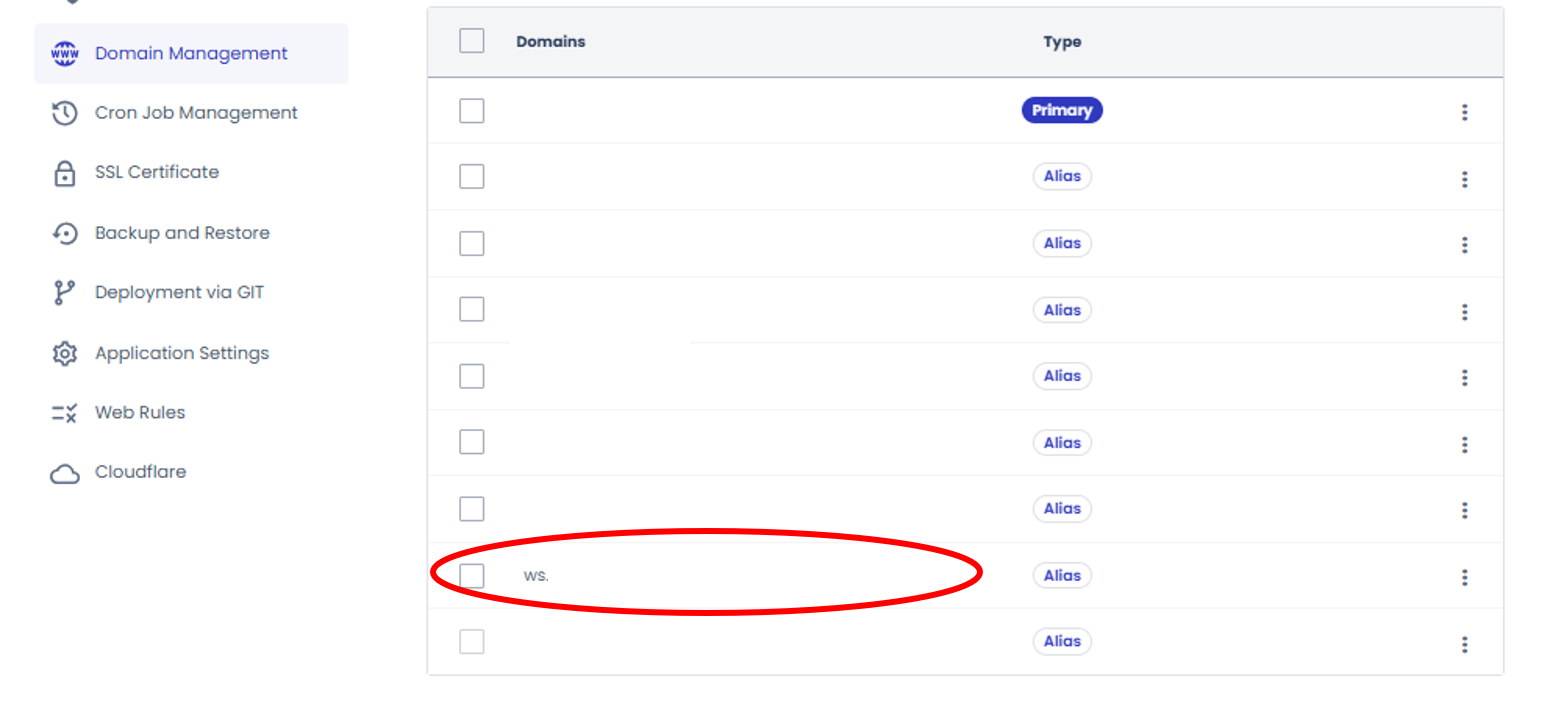
Step 12 - Cloudways Domain Mapping⎘
Go to Cloudways → My Applications → Domain Management and add ws.yourdomain.com as an alias domain.
Step 13 - Disable HTTP/2 in Nginx⎘
Contact Cloudways support with this message:
Please comment out
http2 on;in my application’s Nginx server block. I need HTTP/1.1 for WebSocket support with Laravel Reverb.
This is required because Nginx HTTP/2 strips WebSocket upgrade headers.
Step 14 - Nginx WebSocket Proxy⎘
Contact Cloudways support:
location /app {    proxy_pass http://127.0.0.1:8091;    proxy_set_header Host $host;    proxy_set_header X-Real-IP $remote_addr;    proxy_set_header X-Forwarded-For $proxy_add_x_forwarded_for;    proxy_set_header X-Forwarded-Proto $scheme;    proxy_set_header X-Forwarded-Host $host;
    # WebSocket support    proxy_http_version 1.1;    proxy_set_header Upgrade $http_upgrade;    proxy_set_header Connection "upgrade";    proxy_buffering off;    proxy_read_timeout 86400s;}
Step 15 - Supervisor Job for Reverb⎘
Note: Port 8080 may already be in use on Cloudways. If you get an “Address already in use” error, use port 8091 instead. Update
REVERB_SERVER_PORT=8091in your.envaccordingly.
A. Contact Cloudways support to create the queue supervisord job⎘
“I need a new Supervisord job created for Laravel Reverb WebSocket server. Please configure it with:
- Command:
php artisan reverb:start --host=0.0.0.0 --port=8091- Number of processes: 1
- Auto-restart if it stops
- This is a WebSocket server, NOT a queue worker — no
--queue,--sleep,--tries,--quiet, or--timeoutflags”

B. Verify after support confirms⎘
ps aux | grep reverb
This should show the Reverb process running.
Step 16 - Clear Caches⎘
php artisan config:clearphp artisan route:clearphp artisan cache:clearStep 17 - Verify Production⎘
- Check Reverb is running:
ps aux | grep reverb
- Test whether the port is listening:
curl -i http://127.0.0.1:8091It should return HTTP/1.1 404 Not Found, which means Reverb is responding.

- Test WebSocket handshake directly, bypassing Nginx:
curl -i -N -k --http1.1 \ -H "Connection: Upgrade" \ -H "Upgrade: websocket" \ -H "Sec-WebSocket-Version: 13" \ -H "Sec-WebSocket-Key: dGhlIHNhbXBsZSBub25jZQ==" \ -H "Host: ws.yourdomain.com" \ https://localhost/app/<your-reverb-app-key>It should return 101 Switching Protocols.
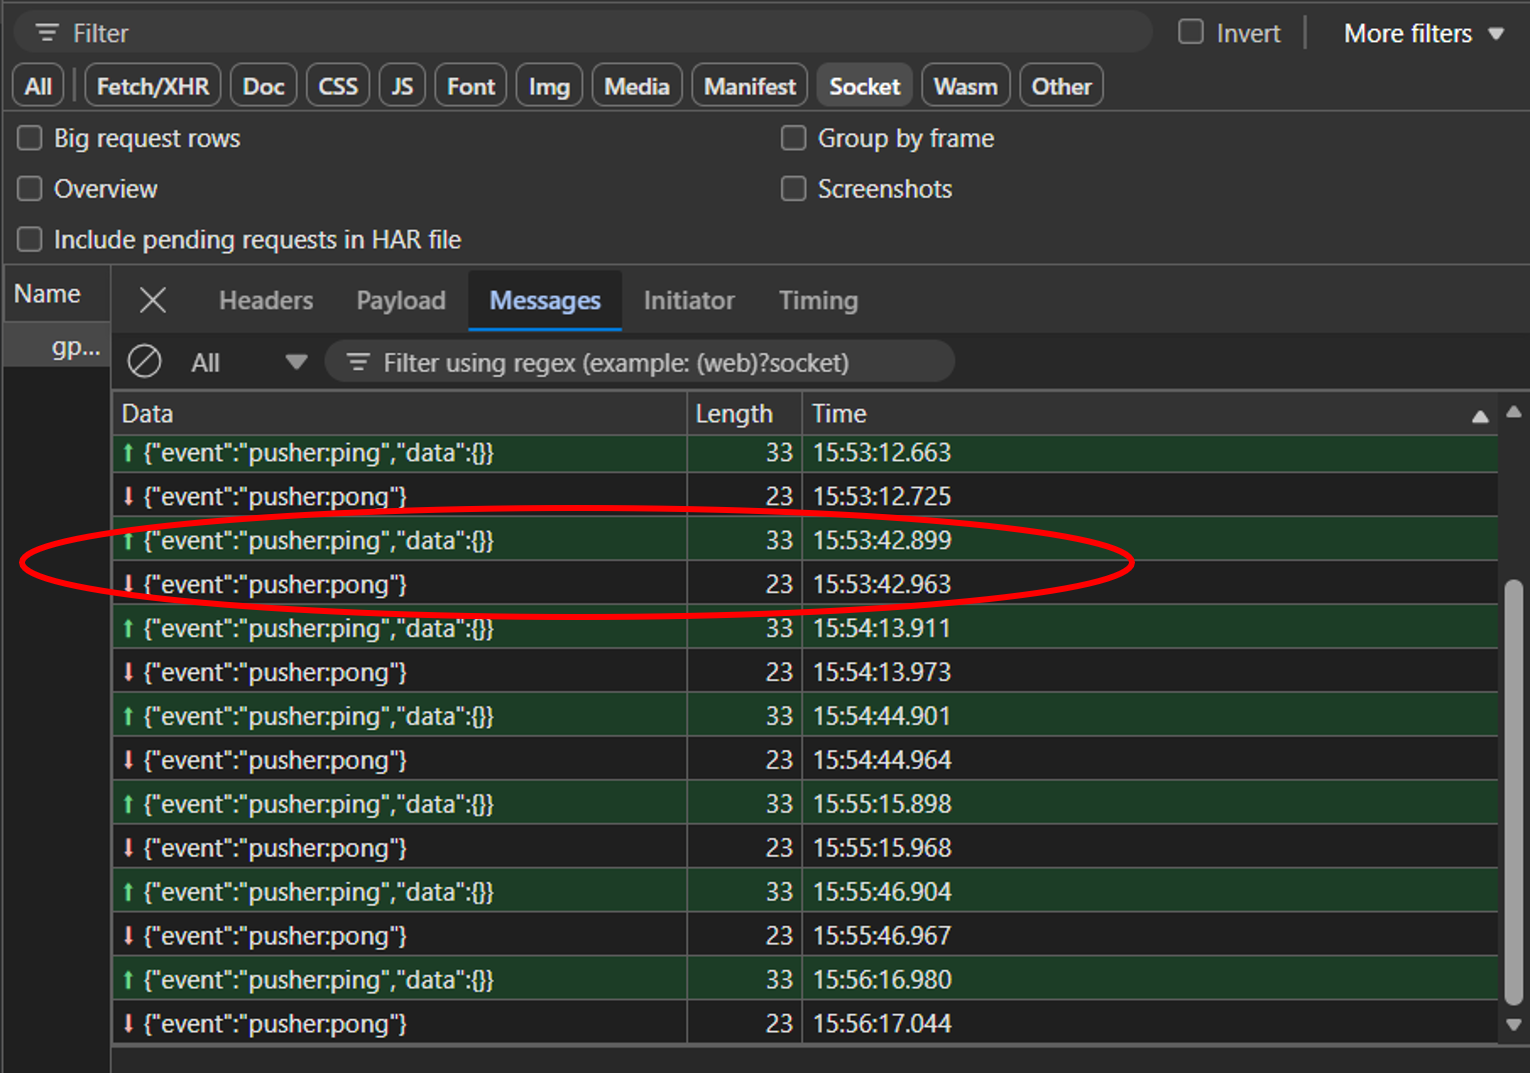
- Check the browser:
Open System in Browser → DevTools → Network → Socket tab (Edge) or WS tab (Chrome). You should see wss://ws.yourdomain.com/app/... with 101 Switching Protocols and ping/pong messages.

- Test a broadcast:
php artisan tinker --execute="\App\Models\User::all()->each(fn(\$u) => \Filament\Notifications\Notification::make()->title('Reverb is Live')->body('Real-time notifications are now enabled.')->broadcast(\$u));"A toast notification should appear in the browser instantly.
Final Architecture⎘
Browser (wss://ws.yourdomain.com:443)    → Cloudflare (proxied, orange cloud, WebSockets enabled)    → Nginx (location /app → 127.0.0.1:8091, HTTP/2 disabled)    → Laravel Reverb (0.0.0.0:8091)
Laravel Server-Side (broadcasting events)    → http://127.0.0.1:8091 (local, no SSL)    → Laravel Reverb    → pushes to connected browsers
Troubleshooting Cheatsheet⎘
| Problem | Solution |
|---|---|
| Reverb not running | ps aux (vertical bar) grep reverb then sudo supervisorctl restart <job_id> |
Browser wss:// connection error | Check Nginx proxy exists, HTTP/2 disabled, Cloudflare WebSockets enabled |
Browser ws:// mixed content error | Ensure REVERB_SCHEME=https in production .env |
| Broadcast fails with SSL error | Ensure config/broadcasting.php uses REVERB_SERVER_HOST (127.0.0.1), not public domain |
| No toast notification | Check failed jobs: php artisan queue:failed, flush with php artisan queue:flush |
Address already in use error | pkill -f "reverb:start" then restart Supervisor |
| Config not taking effect | php artisan config:clear |
Nginx returns 500 on /app | HTTP/2 is enabled - ask Cloudways to disable it |
curl SSL certificate error from SSH | Normal for Cloudflare Origin certs - use -k, browser should still work |

Comments & Reactions
(click to open)